 I decided to create a Christmas card that does not follow the usual format. I trimmed about 2" off from the front flap of a card. I added background paper to the front flap, as well as to the inside of the back flap. The Poinsettia was stamped on a separate piece of cardstock, framed in silver and attached to the front panel. This Christmas try new layouts for your cards and I'm sure you'll be happy with the result.
Saturday, December 6, 2008
More Poinsettias!
I decided to create a Christmas card that does not follow the usual format. I trimmed about 2" off from the front flap of a card. I added background paper to the front flap, as well as to the inside of the back flap. The Poinsettia was stamped on a separate piece of cardstock, framed in silver and attached to the front panel. This Christmas try new layouts for your cards and I'm sure you'll be happy with the result.
Saturday, November 15, 2008
Holiday Centerpiece

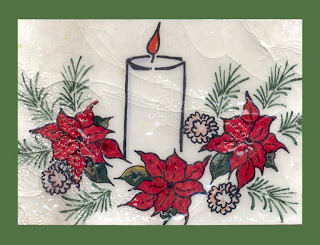
This is a fun stamp set to use because you may create your own floral arrangement.
Use the stamps together or use on their own.
Create a wreath from the Poinsettia stamp by stamping the Poinsettia in a circle.
I used UTEE to create the 'cracked glass' effect for this card.
Use the stamps together or use on their own.
Create a wreath from the Poinsettia stamp by stamping the Poinsettia in a circle.
I used UTEE to create the 'cracked glass' effect for this card.
Tuesday, November 11, 2008
Have a Wonderful Giraffe-filled Christmas!


The new Santa Giraffe from WillowGrove is lots of fun! You may recognize this silly giraffe from his ghost-y appearance at Halloween. Now he is dressing up as Santa for the Holidays! This stamp is perfect for a lighthearted Christmas card.
Don't forget to check out our new designs at
http://www.willowgrovestamps.com
Don't forget to check out our new designs at
http://www.willowgrovestamps.com
Friday, November 7, 2008
All Decked Out for Christmas
 Design your own reindeer this holiday season with WillowGrove's 'All Decked Out for Christmas' Stamp set. You may add Snowflakes, Holly, Presents, Christmas lights and more! This stamp set is versatile because you may create many different cards using the same stamps. You may order the Reindeer stamp set today from our website http://www.willowgrovestamps.com
 Have fun!
Tuesday, October 28, 2008
Pumpkin Searchers Don't Give Up!
Keep looking, the hidden pumpkin is hiding on our blog!
A Clue:
Look for the cat in the flowers who is hiding above the pumpkin.
This is an old post so please go back more than 3 pages.
Monday, October 27, 2008
Willow is getting excited about the holidays!

It isn't quite Halloween yet but Willow is getting ready for Christmas!
It is time to start creating your Christmas cards because the holidays
will be here before we know it!
It is time to start creating your Christmas cards because the holidays
will be here before we know it!
Christmas SongBird

The Christmas Songbird and Dots & Flourishes stamp set are new to WillowGrove!
The Dots & Flourishes are fun to collage together using different color ink.
The Dots & Flourishes are fun to collage together using different color ink.

Christmas Songbird

Dots & Flourishes
Monday, October 13, 2008
Great Pumpkin Search
The pumpkin has been hidden somewhere on our WillowGrove Blog!
Find it for your chance to win
prizes from Scrapbooking Roads.
Have fun!
Find it for your chance to win
prizes from Scrapbooking Roads.
Have fun!
Thursday, October 9, 2008
New Border Terrier Stamp
 The Border Terrier Stamp is the newest addition to WillowGrove Stamps! Do you have a special request? We can help! Simply email me at kathryn@awillowgrovestamp.com
Keep a lookout for new Christmas designs as well! They will be coming soon!
Thursday, October 2, 2008
Have a Spooooky Halloween!
 Ghosts, Spiders, Bats and a Haunted House are fun for Halloween. The Spooky Halloween Stamp Set from WillowGrove gives you many variations on how to stamp your Halloween card. Create many different cards using the same Stamp Set.
Thursday, September 25, 2008

Tuesday, September 23, 2008
Scary Jack-o-lantern!

Try something different the next time you create a card. Rather than creating a regular sized card, make a 4 X 4 card first. Add most of your details to the tiny card. Next, adhere it to a regular sized 4 1/4 X 5 1/2" card. Add embellishments like flowers and pearls. The emphasis continues to be on the 4 X 4" card that you first created while at the same time, giving you the freedom to create a regular sized card.
Tuesday, September 9, 2008
Who Says You Only Need to Use Paper When Creating a Card?
 Instead of using cardstock and pattern paper for my card I used bits of fabric! I used gluedots to adhere the fabric to a card. I added ribbon and an antique picture hanger for a final touch.
I set aside my markers to colour the horse. Instead, I used a Versamark Pen to fill in the entire horse. I covered the horse in sparkly embossing powder and heat set. I then used the fine tip of the VersaMark pen to outline the horse and embossed in Black.
Try pushing the limits of your next handmade card. Remember not to be afraid to try new things.
Friday, September 5, 2008
Dachshund

This is a terrific way to dress up a card. Colour your WillowGrove Dachshund by sponging dye ink directly onto the cardstock. Add highlights with markers and Stickles for unexpected fun. Punching out the flower pattern and gluing them over the black border brings continuity to your card.
Thursday, August 28, 2008
Summer Isn't Over Yet!
 Summer isn't over yet but Fall will soon be here! Time to start making fall greeting cards. The Autumn Wreath stamp has a bow at the bottom. However, I only inked the leaves on the wreath and added a real bow. Adding ribbon and embellishments to your cards always adds something unexpected. Have fun before the leaves start falling!
Thursday, August 21, 2008
Sweet Thomas Card

WillowGrove's Russian Blue stamp is based on my childhood cat named Thomas. He was a lovely cat who had fur that felt like silk. I still miss him even though he has been gone for many years.
This card was created using bits of Scrapbook materials. Add flourishes and bows to add elegance to a card.
Friday, August 15, 2008
Spooky Long Legs in RubberStampMadness!

Be sure to pick up the latest issue of RubberStampMadness. Featured on page 54 is my Halloween card made with WillowGrove's Halloween Giraffe. This is my favourite stamp and it is fun to see it in this wonderful magazine.
Wednesday, August 13, 2008
WillowGrove is Scrapbooked!

It is fun to using Stamping on your Scrapbook layouts.
WillowGrove Stamped images make wonderful embellishments.
Try using the Fabulous Flower stamp on your next project.
WillowGrove Stamped images make wonderful embellishments.
Try using the Fabulous Flower stamp on your next project.
 Add buttons and sparkles to the Fabulous Flower Stamp for extra glamour!
Tuesday, August 5, 2008
Black and White Card
 I thought I would challenge myself to create a card that is mostly black and white. I had leftover pieces from a scrapbook layout that I used to create my card. Remember to use all of your scraps from other projects! Don't let anything go to waste. I used soft peach and a light brown to add highlights to the Gerbera Daisy.
Wednesday, July 16, 2008
Greg Jenkins Photography
For those of you who love photography, visit my brother Greg Jenkins' blog:
http://www.gregjenkinsphotogallery.blogspot.com/
He has a unique perspective on capturing things that many of us overlook.
http://www.gregjenkinsphotogallery.blogspot.com/
He has a unique perspective on capturing things that many of us overlook.
Happy Summer!
Hi everyone,
I hope that you are having a wonderful summer!
Just to let you know, I will be posting new cards in August.
Check back soon and Happy Stamping!
-Kathryn
I hope that you are having a wonderful summer!
Just to let you know, I will be posting new cards in August.
Check back soon and Happy Stamping!
-Kathryn
Wednesday, July 2, 2008
Wedding Bouquet Card

I recently made this card for my friend's wedding anniversary. I adhered the WillowGrove Wedding Bouquet image onto a transparent card that I put through the Cuttlebug. I added a bow and a charm for extra dimension. You may be wondering if this was a hand delivered card because of the chunky embellishment. Actually, I mailed it but I asked for it to be hand stamped. Don't be afraid to add glitz and glamour to your handmade cards.
Thursday, June 26, 2008
Same Stamp, Different Look

What a versatile stamp!
For a completely different look, I stamped the lighthouse
in black dye ink and coloured it with markers.
We will be creating this card in July's Stamp Club.
For a completely different look, I stamped the lighthouse
in black dye ink and coloured it with markers.
We will be creating this card in July's Stamp Club.
Lighthouse
 Summer is a wonderful time to celebrate Lighthouses. This is one of the cards that we will be making this month in Stamp Club. Take a break from the heat and create some WillowGrove Summer Spectacular Cards!
Tuesday, June 17, 2008
Christmas in July Class

Every year at Lasting Impressions, we have a Christmas in July card making class.
This is a Christmas card that we will be making with a brand new WillowGrove design.
The Poinsettia Wreath card has a Heritage quality with ribbon and yellow crystals.
Even though we are only in June, this is the perfect time to start your Christmas cards,
especially if you have as many to make as I do!
Sign up today for
Christmas in July
because you won't want to miss it!
Tuesday, June 10, 2008
John's First Father's Day

This will be John's first Father's Day. To celebrate, I designed a new stamp! Now John can remember the fun times that he and Kristopher have had this year.
Happy Father's Day, John!
Tuesday, June 3, 2008
Happy Father's Day Card
 This is another fun example of a Father's Day card using the J.D's Fishing Stamp. Try adding more than one type of ribbon to your next card. I used a faux-suede ribbon and a piece of wire ribbon. The wire ribbon continues the theme of tangled fishing line.
Tuesday, May 27, 2008
New Website Up and Running
I am pleased to let everyone know that the new website is up and running! I am very excited that it is online before my mid-June deadline!
Visit WillowGrove Stamps at www.willowgrovestamps.com
I will have a new card sample for the blog next week.
Thank you everyone for your support,
Kathryn
Tuesday, May 20, 2008
Happy Father's Day Card

This is a card using J.D's Father's Day stamp. I loved the pattern in the paper that I used because it reminded me of tie material. This will be John's first Father's Day and I wonder if I should buy him a tie?
Friday, May 16, 2008
SunShine Flower Tag

Transparencies are so much fun and I really enjoyed creating my SunShine Flower Tag.
I stamped the SunShine flower on cardstock and coloured it with Tombow Markers. I cut it out and glued it to pattern background paper.
I wrapped pretty ribbon around the transparent tag and adhered it to the back with gluedots. I added pearls to the ribbon for some extra glamour. Next, I put gluedots behind the ribbon so that it wouldn't show through and adhered it on the pattern paper. I cut the paper to the shape of the tag.
The last step was to add the Sun Charm and ribbon to the top of the tag.
I think this tag will make a beautiful addition to my Mom's birthday present. Happy Birthday Mom on May 18!
Friday, May 9, 2008
Altered Dream Box
 This is another Altered Dream Box by Art Chix Studio. It is much smaller than the first Dream Box that I altered. I added beads, brads and flowers. Using Black Staz On ink, I stamped Small Flower at the top. I liked how it blended in with the engraved flowers of the Dream Box. I inserted a picture of my Grandmother who was married to my Grandpa Sam (featured in the first Dream Box). She ran Samson Fish until she was 81 years old. I think this picture of my Grandma is among my favourites.
Thursday, May 8, 2008
Can You Resist the Fabulous Flower Card?

I am finding it hard to resist the "Resist" technique. A while ago my friend Angela sent me a cardboard DVD case that was completely filled with colour and stamped images. It inspired me and was always a project that I wanted to try myself. I finally made time to do this project but like many of my projects, it evolved from my original intent.
To create this card, I stamped Fabulous Flower in different colours of pigment ink on kromekote paper. Next, I embossed in clear powder. Then I directly sponged pigment ink over the entire card. The ink stayed off of the embossed flowers and the vivid colours of the flowers remained. I then placed a paper over the card and heated it with an iron. (I think this is the only time I bring out my iron...isn't an iron made for Stamp techniques?) I covered the kromekote with Versamark ink and coated it in clear powder once again. This time I heated it with a heat gun to create a linoleum tile effect.
Thursday, May 1, 2008
Cards by Angela
 My friend Angela mailed me some adorable cards that she created with WillowGrove Stamps. It was a wonderful surprise to receive a large envelope (decorated, of course!) in the mail full of beautiful cards! Thank you Angela!
Wednesday, April 23, 2008
Cat in Flowers

Willow is an inside cat but if she had it her way she would be spending her time hiding in the flowers in my garden. What a bright and cheerful card to celebrate Spring! Don't forget to add extra goodies from Creative Cafe at Lasting Impressions. Cat in Flowers stamp will be available soon in the mini calendar cases.
Tuesday, April 22, 2008
You Found the Pumpkin! Congratulations!!!!

Visit our website for WillowGrove Stamps for more great card ideas!
Have you seen our Haunted House Halloween Stamp Set?
Coming Soon!!!! Keep checking back to see our new line of Christmas Stamps!
Santa says there will even be a Christmas Giraffe!
Have you seen our Haunted House Halloween Stamp Set?
Coming Soon!!!! Keep checking back to see our new line of Christmas Stamps!
Santa says there will even be a Christmas Giraffe!
Friday, April 18, 2008
WillowGrove's New Look!

I love storing my clear stamps in calendar cases so I looked into finding mini calendar cases to create a home for the 3 x 4 stamps. I am very excited to announce that WillowGrove Stamps will now be using mini calendar cases for packaging. I often found that the clear bags would tear easily and trying to place the stamp back into the bag after I used it was sometimes difficult. The calendar cases are easy to stack and they are reuseable! Plus they are the cutest little things. In the next few weeks Lasting Impressions is going to redo the WillowGrove wall to focus on the new mini calendar cases. It is now Springtime and we are ready for a whole new look!

Sunday, April 13, 2008
Inside Out Card
 I decided to do something different when I made John's birthday card. I decided to leave the outside of the card plain and decorate the inside of the card. I call it my Inside Out Card.
 I used many layers of Alcohol ink on white shiny Kromekote paper. I couldn't leave the Cuttlebug out of this project so I used the Birthday template on my decorated paper.
 Don't be afraid to combine WillowGrove stamps. I coloured the heart and flowers with Tombow markers. Tombow markers take longer to dry on Kromekote paper so this allowed me to pour Goddess Gold Embossing Powder (clear powder with gold sprinkles and yes, you can find this at Lasting Impressions) and emboss! This technique adds texture and allows the images to 'pop'.
The last step was to write John a Happy Birthday message. I used a black permanent ink pen which worked well on the shiny paper. But I'll keep my message a secret! :)
Wednesday, April 9, 2008
Happy Birthday, John!

Don't forget to use your WillowGrove stamps for projects other than cardmaking. This is a fun bucket I decorated to wrap a gift for my husband John. As many of you know, he works at Cameron Paint so I thought a Paint Can theme would be more fun than wrapping his gift in ordinary wrapping paper. I created a custom stamp of John and used that as my main image.
Don't miss out on Beth's Cuttlebug class this Saturday at Lasting Impressions for more ideas on decorating cans. They are perfect for holding candy (Yes, I did think of putting candy instead of a gift in this bucket but I was afraid I would eat it before John's birthday so I opted for a regular gift instead) or special gift items.
Wednesday, April 2, 2008
Transparency Fun!

Transparencies are a lot of fun to incorporate onto your cards. I applied Alcohol ink to Kromekote and ran it through the Cuttlebug. This is a great way to create your very own one-of-a-kind paper. Next, I used black Staz-On ink and stamped Fabulous Flower onto a transparency. I wanted the flower to "Pop" so I stamped it again on plain white cardstock using black dye ink. I coloured the flower with Tombow markers, cut it out and glued it behind the transparency flower. I added a sparkley "bobble" from my stash of goodies. Of course, the last step was to add Burgundy Stickles!
This Saturday I will be teaching different techniques using transparencies to the Stamp Club at Lasting Impressions.
Wednesday, March 26, 2008
Beth D's Bead Class

I know, this isn't a WillowGrove card but it is so pretty I thought I would post it anyway. I made this card in Beth D's bead class at Lasting Impressions last week. It was easier to make than I thought and renewed my love for beads. I haven't worked with beads in almost two years so I was very excited to use them again. Beth taught a wonderful class and she explained things so clearly that everyone was able to create a gorgeous card.
A lot of people think working with beads is fussy and they won't have the patience. I suggest giving it a try before passing judgement because you just might surprise yourself.
I am looking forward to more bead classes at Lasting Impressions in the fall. I'm going to dig out my old beads and see what other creations I can come up with. FUN!
Wednesday, March 19, 2008
Butterfly Card

To create the Butterfly card I used one of my favourite techniques
using Alcohol ink and a transparency.
I used the same technique for April's Stamp Club. Call Lasting Impressions 519 332 8846 for details.
Don't forget to use scrapbook embellishments to dress up your cards.
using Alcohol ink and a transparency.
I used the same technique for April's Stamp Club. Call Lasting Impressions 519 332 8846 for details.
Don't forget to use scrapbook embellishments to dress up your cards.
Wednesday, March 12, 2008
Altered Dream Box
 This is my Altered Dream Box featuring my Grandpa Sam.
My Grandpa and Grandma owned a fish store in Mt. Clemens, Michigan.
During WWII they supplied Selfridge Airforce Base with fish.
I stamped WillowGrove Swirls with Staz On ink on the glass door.
I will be teaching a class at Lasting Impressions on Altered Dream Boxes in the fall. There will be different shapes of Dream Boxes (by Art Chix Studio) to choose from. I will be posting the different Dream Boxes as I create them. If you are interested in taking the class, please phone the store (519) 332 8846, leave your name and number and we will phone you when we have a date. In the meantime, save any pictures, beads, charms, odds and ends that fit your theme. You will also be receiving beads and charms to use in the class.

I used my Grandpa's old fishing lure and a receipt from Samson Fish as embellishments.
Tuesday, March 4, 2008
Hoppy Easter

This is an adorable little Easter card for a friend who is expecting.
I designed the Expecting Bunny stamp for a friend last year.
For a soft look, use a hint of chalks and a touch of Stickles.
I designed the Expecting Bunny stamp for a friend last year.
For a soft look, use a hint of chalks and a touch of Stickles.
Sunday, March 2, 2008
Design a Flower Stamp Set
 Hi everyone,
This is the flower stamp set that Beth used for her card.
As you can see there are endless possibilities to design flowers unique to your card.
As you can see there are endless possibilities to design flowers unique to your card.
Thursday, February 28, 2008
Flower Card by Beth

Isn't this one of the prettiest cards that you have ever seen?
If you love it as much as I do and you live in the Sarnia area, you will want to sign up for Beth's class at Lasting Impressions.
The date hasn't been set yet but it will be in April. Please call Lasting Impressions
(519) 332 8846 for details.
Beth will be teaching you how to use your Tombow markers to shade, contour and make your stamped images pop.
You will be using Willowgrove Design a Flower Stamp and creating 4 different cards during your class.
If you can't make it to Beth's class please call Lasting Impressions and order your Design a Flower Stamp set.
Subscribe to:
Posts (Atom)


